Category: Craft

  • Are you a Cloud Gazer?

    Are you a Cloud Gazer?

    Cloud Gazer Shawl knitting pattern by Bronwyn Hahn

    Night or day, I look to the sky every time I step outside. I search for the moon, my favorite constellations and planets, rainbows, and interesting clouds. I can’t put my finger on it, but maybe it’s because the vastness of the heavens makes me feel small and great at the same time. What about you? Do you look up before you go about your day? Are you a Cloud Gazer? Maybe it’s time to start looking up.

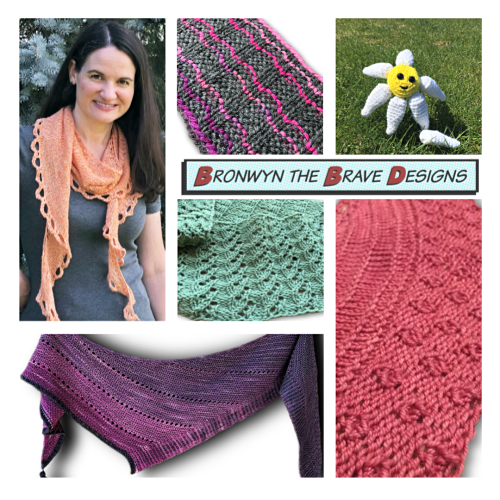
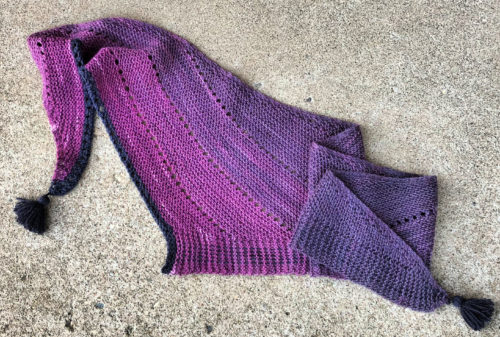
    Cloud Gazer is my newest shawl pattern. I was first inspired by the yarn—Show Stealer by Leading Men Fiber Arts. Among the hundreds of skeins on display, I was continually drawn to the one called Head in the Clouds. The soft halo alone could have won me over, but the colorway evoked an image I couldn’t shake. I knew this was the one for my next design.

    Stratocumulus Clouds--The inspiration behind the Cloud Gazer Shawl pattern by Bronwyn Hahn
    Stratocumulus Clouds

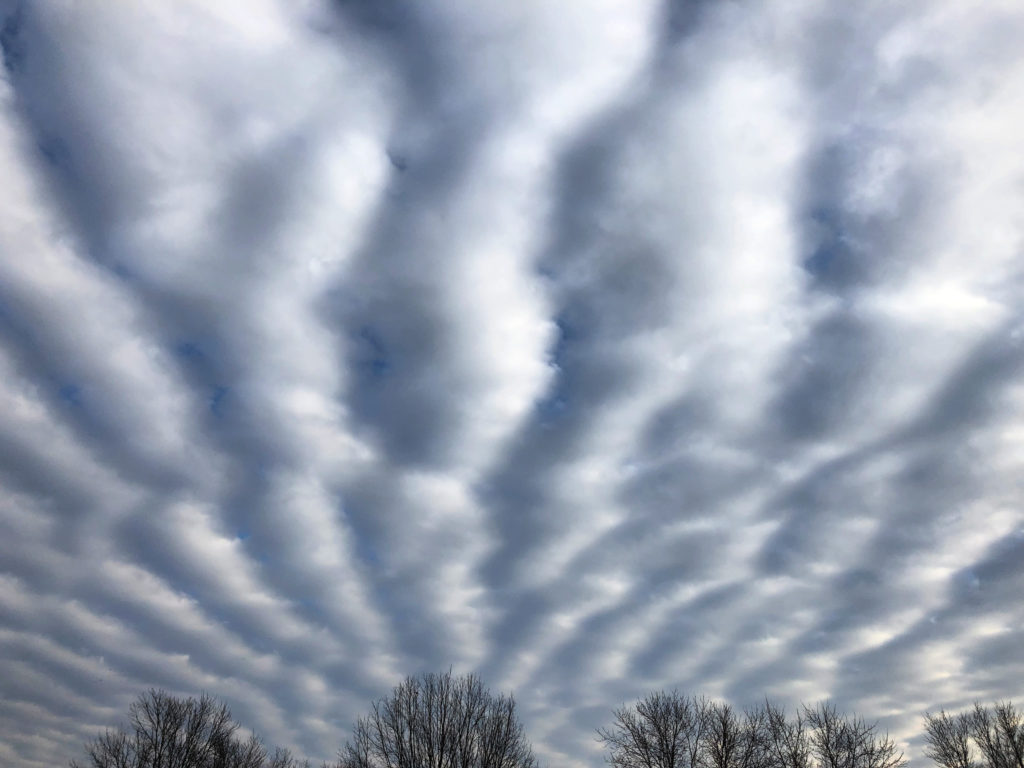
    Soon after that, I stepped outside to a sky filled with bands of stratocumulus clouds. I found a stitch pattern that reminded me of these clouds and how they were shifting in the wind. After a bit of math and some charting, I cast on. Before it’s blocked the fabric really does look like those clouds. After blocking, the texture is more subtle, but the effect is still there.

    From the pattern:

    Cloudy days get a bad rap, but there’s so much to behold in the celestial mist. Who hasn’t searched for familiar shapes among the puffs of white? From the wispy cirrus clouds to the foreboding cumulonimbus, their ephemeral beauty makes time stand still as the heavens advance. On all but the clearest of days, we have a free ticket to an amazing moving picture show.

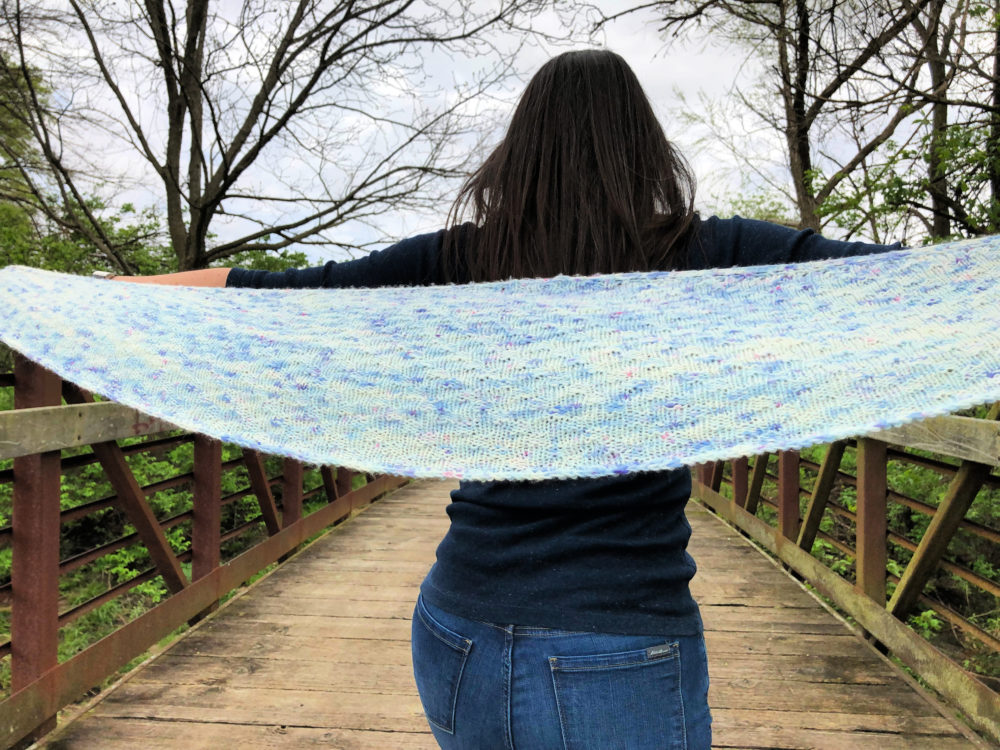
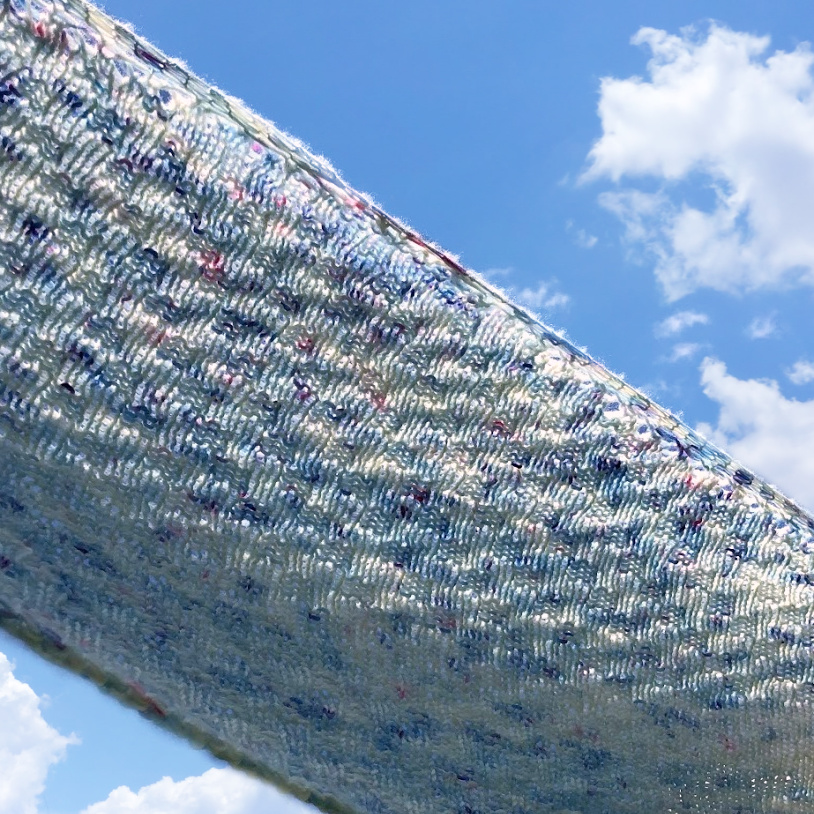
    Cloud Gazer is a top-down crescent shawl with an all-over knit-purl pattern. The simple shaping and straightforward stitch pattern are perfect for daydreaming. The knits and purls shift every few rows, creating diagonals of stratocumulus clouds. Knit in a luxurious merino-cashmere-nylon fingering, an ethereal halo adds to the reverie. The curling ends flutter in the breeze as you watch Mother Nature paint her happy little clouds on the vast blue canvas.

    Big finish?

    But how do I finish the shawl? I usually have a good idea of how the design will end before I even begin. This time, I just wasn’t sure. I started with a light ruffle, but I ran out of yarn before it was deep enough to really look like a ruffle. Then I tried a different ruffle. Hmm. Still not quite right. Maybe something else. Well, the third attempt wasn’t even noteworthy enough for me to remember what I tried. When all was said and done, I had picked up about 280 sts and ripped out 35 grams three times. (Yes, one-third of the shawl. Three times. And no lifeline. Three times.)

    Then I finally decided that I didn’t need to gild the lily. I’d just knit until I was almost out of yarn and then bind off. I played around with different bind-offs. Then something magical happened. Dare I say, I think I’ve come up with a new bind-off! (Actually, two! Eep!) You can watch the video for Bronwyn’s Kfbf Bind-Off on my YouTube channel. I don’t think I’ve seen this bind-off before, but please let me know if you’ve seen it so I can give credit.

    Cloud Gazer is available now in my Ravelry store. The pattern is on sale through May 18, 2019—no coupon necessary. However, if you sign up for my newsletter, you’ll get a coupon for 20% off any pattern in my store. And if you’re already a subscriber, be sure to check your email for your exclusive discount.

  • Beautiful Snowscape

    Beautiful Snowscape

    Snowscape Hat and Cowl knitting patterns by Bronwyn Hahn -- When the snow has fallen but the wind continues to blow, that’s when the snowscape really comes to life. The wind transforms the terrain into a frozen wonderland. The fine powder skitters along until it finally catches and holds tight, leaving ripples of snowy waves.

    As I admitted a few weeks ago, I’m not a big fan of winter. This winter has been particularly brutal for much of the country. And we still have several more weeks before we’re out of the woods. Mother Nature sure knows how to put on a show, however. Whether it’s snow or frost or ice, I can usually find beauty in it once I overlook the cold.

    Snow is in the forecast again this week. This time, it comes in the form of my Snowscape Hat and Cowl patterns. I was inspired by drifting snow and how it paints a peaceful picture despite the fierce winds and bitter cold.

    You can buy both patterns from my Ravelry store now! They’re on sale through March 10, 2019. Save $1 on either of the patterns or $3 when you buy the e-book! No coupon needed.

    (more…)
  • Inspired by Winter

    Inspired by Winter

    True confession: I don’t really like winter. Or summer, for that matter. I prefer the moderate, comfortable temperatures of spring and fall. However, winter does provide such a lovely backdrop for daily life; I just prefer to see it from the warmth of my living room window. Despite my objection to the cold, I do seem to find great beauty (almost) every time I step outside. Besides, winter lets me enjoy my knitwear every day.

    I have three new patterns that were inspired by winter. The first is Frost Heaves Cowl, and it’s available now! (Watch for Snowscape Cowl and Hat to be released soon!) This pattern has been churning in my head for a couple of years now. First of all, the nerd in me just loves that there is a word for the geological phenomenon. Frost heaving happens when the top layer of soil starts to thaw as groundwater refreezes and pushes the soil upward. There’s a bunch of science involved, but the effect is completely fascinating to me. The cables in this cowl mimic the swollen mounds of earth, and the lacy, shivering ribs resemble the broken soil.

    (more…)
  • Bronwyn’s Handmade Christmas 2018 Bonus: Tassel Angels

    Bronwyn’s Handmade Christmas 2018 Bonus: Tassel Angels

    I couldn’t resist one more quick project.

    Wow! Less than a week until Christmas?! Aside from wrapping all my gifts, I think I’m ready. (But do you think I’ve managed to wrap any of them yet? Ha! That’s what Christmas Eve is for, isn’t it?)

    I normally only post ideas from June to November, but I couldn’t resist showing you this one. If you’re looking for a quick, easy, and affordable add-on, these tassel angels are perfect. They’re perfect for topping a wrapped package or for hanging on the tree.

    I used Caron Simply Soft Party–an acrylic yarn with a metallic thread wrapped around it. Make a tassel, wrapping the yarn about 22 times around your hand. Don’t cut the loops. Attach pipe cleaner wings and halo, and you’re good to go! I’ve made a video to show how to make them.

    How to make tassel angels

    So that’s all, folks! I hope you’ve enjoyed this year’s Handmade Christmas ideas. I’m always on the lookout for new projects, so if you have ideas to share, I’d love to see them.

    Have you made any handmade gifts this year? I’d love to see them! Tag me on Instagram as @bronwyndp and use the hashtag #bronwynshandmadechristmas.

    Thanks for another fabulous year! I’ll be back with another Handmade Christmas project on June 25, 2019. In the meantime, stay tuned for new knitting and crochet designs. Be sure to subscribe to my newsletter to stay in the loop!

  • Bronwyn’s Handmade Christmas November 2018: Stress Balls

    Bronwyn’s Handmade Christmas November 2018: Stress Balls

    What’s your stress level this time of year? Does someone on your gift list need to chill out? This might be the handmade gift for both of you.

    Sensory toys have become increasingly popular over the past few years. Stress balls and squishies are suddenly current and cool. What used to be a sort of gag gift is now a welcomed desk accessory. Go figure.

    Last spring, a teacher asked me to make stress balls for her class to help them while taking standardized tests. I had crocheted a stress ball for her the year before because I knew she had a few particularly troublesome students. She asked if I could make one like it for each of her 26 students. The problem was that she didn’t think of asking until the week before testing and there simply wasn’t enough time for me to make them. 

    Crocheted stress balls
    Crocheted stress balls made from the Ideal Sphere pattern.
    I made them reversible–happy on one side, angry on the other.

    So I came up with a faster solution. I made bean bags out of polar fleece. I started by tracing 3-4″ circles onto one layer of fleece using a Sharpie. Before sewing two layers together, I used black yarn to embroider eyes. By doing this before sewing, I was able to simply tie the two ends of yarn in a knot to secure. With right sides together, I sewed along the markings, leaving about 2″ unsewn and backstitching at the beginning and end. I trimmed the fleece to about 1/4-1/2″ from the stitching. I turned them right-side out, filled them with poly pellets (not too full), and then hand-sewed them closed. Twenty-six worry pets!

    Here are some other options for knit or crocheted stress balls:

    • Swirl Ball Mystery (knit)–I’ve made this one. It’s an easy 3-color garter stitch ball. It looks neat as an ornament, too.
    • Out of Yarn (knit)–This looks fun, and it’s a good way to use up scraps.
    • Ideal Sphere (crochet)–I’ve used this pattern a few times. You do have to pay attention since the increases and decreases aren’t stacked, but it does make a nice sphere.
    • Puffballs (crochet)–Frankie Brown has so many clever designs.
    • Jett the Octopus (knit)–This is my own pattern, so I’ve knit it approximately one million times. Ok, it just seems like it. But I did make 22 of them for my son’s class four years ago. I’m pretty proud of the fact that despite the number of arms, there are only 4 ends to weave in on the entire toy.
    • Any small toy that fits nicely in the palm of your hand.

    With the fleece toys, I wasn’t too concerned about the poly pellets escaping. I was just sure to keep my stitches small and tight. Besides, these were being used by third graders; even if the beads did come out, they shouldn’t be putting them in their mouths. But for knit and crocheted toys, I’m always more cautious. I found nylon knee high stockings on closeout a few years ago, so I stocked up just for this purpose. (Small balloons might work, too.) Fill the toe of the stocking with about half the amount of pellets you think you’ll need. (If I’m using a cut end, I tie a knot and then turn the knot to the inside before filling.) Then insert the pouch of pellets into your knit or crocheted toy. Continue filling the stocking with the desired amount. Tie a knot in the top of the stocking and trim. Depending on the size and shape of the toy, you may want to add fiberfill before and/or after adding pellets. Finish the toy as usual.

    If you’d like to knit Jett the Octopus, or any of the other patterns for sale in my Ravelry store, you can take advantage of the Indie Design Giftalong. From now until 11:59 p.m. EST on November 29, you can save 25% with the code giftalong2018

    I normally end my Bronwyn’s Handmade Christmas posts in November, but I do have one more super quick project up my sleeve. I’ll share that in the next couple of weeks. (You know, when I have nothing else to do.) Meanwhile, I wish you happy crafting, happy gifting!

  • Indie Design Giftalong 2018

    Indie Design Giftalong 2018

    How are your holiday gifts coming along? Have you been shopping for deals in stores or online? Are you starting to feel the heat of gifting deadlines? Are you taking on big knitting projects this year, or are quick projects the way to go?

    Pattern sale!

    Well, I might be able to help! Have you heard about the Ravelry-wide Indie Designer Giftalong (GAL)? It’s part sale, part game, and part community. It begins tonight (November 23, 2018, at 8 p.m. EST) with a week-long sale on patterns by 349 independent designers, myself included. Each participating designer has created a bundle of 10-20 patterns that are included in the sale. Use giftalong2018 to save 25% on any or all patterns in the bundle! Sweet! But don’t wait! The code is only valid through November 29, 2018, at 11:59 p.m. EST. All of my patterns for sale on Ravelry are included in the sale, so now is the time to stock up! Most of them are quick projects, too, so they’re perfect for the busy season.

    Prizes!

    But that’s not all! Every project you complete from now until New Year’s Eve can help you win one of over 2000 prizes. Any pattern for sale (not free) from any participating designer is fair game. Be sure to post photos of your finished objects in the Ravelry forum for the GAL to win yarn and other awesome physical prizes. And there are some fun games to play every day; I’ve always loved the designer scavenger hunt and alphabet soup. You can win patterns for those!

    Friendship!

    Each type of pattern (e.g., shawls, hats, socks, etc.) has its own thread in the forums. There are general chatter threads, too. It’s fun to see everyone’s projects, read about their holiday traditions, I love the camaraderie of so many others working towards the same goal.

    I know the details of the GAL can be overwhelming and confusing, but my friend, Sarah Shira, made a video that explains everything far better than I can. 

    By the way, even though this is a GIFTalong, that doesn’t mean you have to give away your finished items. Feel free to make yourself a little treat, too!

  • Bronwyn’s Handmade Christmas October 2018: Diversion Safes

    Bronwyn’s Handmade Christmas October 2018: Diversion Safes

    Diversion safe DIY -- Bronwyn's Handmade Christmas
    Two of these things are not like the others.

    What? I’m sure you’re thinking I’ve lost my marbles. Why would I even dream of giving SpaghettiOs to someone as a gift? Besides, this is supposed to be Bronwyn’s Handmade Christmas. And popcorn? That’s kind of boring.

    Diversion safe DIY -- Bronwyn's Handmade Christmas

    Well, that’s exactly the point. You want these gifts to look as uninteresting as possible. Why? Because they are diversion safes — containers that look like everyday objects on the outside but hold valuables on the inside. You can hide your cache in plain sight!

    If you search online, you’ll find all sorts of diversion safes that you can purchase or DIY. It’s a good idea to consider who you’re giving the safe to and where they’re most likely to use a safe. Personality and lifestyle are important to keep in mind. Does your recipient like to travel? A small, portable safe (think Chapstick, sunblock, deodorant containers) might be nice. Does your recipient stash cash all around the house? Then a pantry-based safe (popcorn or canned goods) might be better. (I really like this Miracle Whip safe that you store in the fridge.) Are you making this for a kid? Use an item that wouldn’t look out of place in a kid’s room (think books, wipes containers, stuffed toys). One word of caution: choose something that you won’t forget is a safe and throw away because it looks like it’s used up or old!

    Canned good version

    Full disclosure: I made this SpaghettiOs safe about 10 years ago. (I used this tutorial on Instructables.) This one is mine, but I made a second one for a friend. For whatever reason, this friend loves to hide money all over her house. She has told me, “Now, if I die, I have money here, here, and here.” Do you think I’m going to remember all of her hiding spots? Are you kidding? But I guess I’ll know that we should look.

    This type of safe uses a food can that is opened from the bottom with a side-cutting can opener, leaving the top of the can intact. The old-fashioned opener won’t work. A smaller, plastic bottle with a lid needs to fit inside. This small bottle is held in place with plaster of Paris, and its lid is glued to the cut bottom of the can. This allows the bottom of the can to screw on and the entire safe to stand right side up, completing the illusion.

    Diversion safe DIY -- Bronwyn's Handmade Christmas
    Plaster of Paris adds weight to the can, making the bad guy believe the can is actually full of SpaghettiOs.

    I chose a tall can of SpaghettiOs for a few reasons. First, it was tall enough to fit a plastic spice jar inside. But more importantly, I knew that she hates SpaghettiOs, so she would never try to open the can by mistake and destroy it. It would also be obvious enough to her that she would question it before tossing it in the trash when cleaning out the pantry. Anyone else rifling through the cabinet would just question her eating habits.

    Popcorn jar version

    I made the popcorn diversion safe this week. I think it took me all of 15 minutes to make. I even had all the supplies on hand. 

    Diversion safe DIY -- Bronwyn's Handmade Christmas

    Fill a Mason jar nearly full with popcorn kernels. Press a wide-mouthed bottle into the popcorn until the mouth of the bottle is just below the mouth of the glass jar. I used a medicine bottle, but some tutorials I’ve seen online use a clear water bottle that is trimmed down. There is one spot on mine where the white bottle peeks through a tiny bit near the top. The popcorn shifted a little, so I should have added a few more kernels to fill it; a clear inner bottle would have been disguised better.

    Add popcorn around the sides of the bottle until all the space is filled, all the way to the top. Squeeze hot glue in and around the popcorn near the mouth of the jar, ensuring that contact is made with the jar and the bottle. Tip the jar over to test that no popcorn will spill. Let the glue cool, then cap with a jar lid and ring.

    Diversion safe DIY -- Bronwyn's Handmade Christmas

    I like both of these safes because they feel as heavy as the real thing. If anyone were to poke around in the pantry, these safes would shift around just like their genuine counterparts. 

    So take a look around your house for items you can convert into diversion safes. Do you have someone in mind who might appreciate something like this? I’d love to see what you come up with! Share your projects with me either by email or on social media. Be sure to tag them with #bronwynshandmadechristmas.

    Diversion safes -- Bronwyn's Handmade Christmas
  • Cupid in the Underworld

    Cupid in the Underworld

    I don’t know about you, but I’m always drawn to gradients. (Check out my tips for working with gradient mini-skeins.) I feel like gradients are special, though, and deserve an equally special pattern. As a result, those yarns you once fell in love with sit around in your stash for way too long. Well, Cupid has come to steal your heart!

    Now available in my Ravelry store!

    In Roman Mythology, Psyche was a princess and a mortal whose beauty made Venus jealous. Venus sent her son Cupid to sabotage Psyche’s love life, but he fell in love with her instead. Angry, Venus sent her on a series of deadly errands, but, with the help of the gods, Psyche outwitted Venus at each step. On her final quest, Psyche was to retrieve a gift from the underworld. It was yet another trick, and Psyche fell into a deep sleep. Cupid flew down to rescue her and carried her up to Olympus where he nursed her with ambrosia. This made Psyche immortal, and the two lived happily ever after. (Get it? She became immortal, too.)

    Knit your own love story with Cupid in the Underworld. The boomerang shape is like Cupid swooping down to save Psyche’s life. The bias is emphasized by the gradient yarn and a row of eyelets worked at each color change. Charming embellishments elevate the garter stitch shawl from earthly to Olympian. Simple embroidery along one edge represents the journey to find love; tassels at each end are sweet ambrosia to nourish your crafty soul.

    [maxbutton name=”Buy now!”]

    Simple embroidery elevates this shawl from earthly to Olympian. Cupid in the Underworld by Bronwyn the Brave Designs.
    The simplest embroidery ever

    I hope you fall in love with Cupid as much as I have. From now until October 29, 2018, you can save $1 on this pattern with the code: CUPID. Are you on my email list? Check your inbox for a special code for an even deeper discount!
    You can find Cupid in the Underworld with my other designs on Ravelry.

    Cupid in the Underworld shawl knitting pattern -- Bronwyn the Brave Designs -- Knit your own love story. The boomerang shape is like Cupid swooping down to save his beloved Psyche from the underworld. Charming embellishments elevate the garter stitch shawl from earthly to Olympian. Simple embroidery along one edge represents the journey to find love; tassels at each end are sweet ambrosia to nourish your crafty soul.
  • Bronwyn’s Handmade Christmas September 2018: Mandala Bookmarks

    Bronwyn’s Handmade Christmas September 2018: Mandala Bookmarks

    Hand-drawn Mandala Bookmarks–Bronwyn the Brave Designs–Bronwyn’s Handmade ChristmasWith the start of school, I’ve been inspired by all the fun school supplies out there. For this month’s Handmade Christmas idea, I channeled my inner schoolgirl and drew you a picture!

    Adult coloring books and zentangling have been popular for a few years now, so I’m sure you’re familiar with them. It’s relaxing just to draw or color for a few hours. The problem is that typical coloring book pages remain hidden inside their books and no one gets to see them. I’ve come up with a way to share my pretty drawings and create extremely inexpensive but useful gifts.

    My favorite way to showcase my drawings is to slice them up and turn them into bookmarks. I’ve also turned a couple into tags for my son’s school bags. And if you make a mandala that you really love, why not frame it and hang it in your home?

    I made a bunch of bookmarks a few years ago for my son to give his classmates. (I’ve had parents tell me that their kids still use them three years later.) I had a few left over to give as my own gifts. My only mistake was that I forgot to make copies!

    But not this time, my friends! I scanned my original black and white drawing for you to color yourself. I’m not claiming to be a great artist, and this is very obviously hand-drawn, but isn’t that the point? I’ve also included a few tips to get you started on your own mandala drawing. (more…)

  • Bronwyn’s Handmade Christmas August 2018: Weighted Blankets

    Bronwyn’s Handmade Christmas August 2018: Weighted Blankets

    This month’s handmade gift idea is weighted blankets. Have you heard about these? If you haven’t, imagine a blanket made with a couple hundred bean bags sewn together. It’s not quite the same, but it sort of looks like it.

    So why would someone want a weighted blanket? They are said to be therapeutic for adults and children with autism, ADHD, anxiety, insomnia, restless leg syndrome, and other sensory disorders. A friend with restless leg syndrome swears by her blanket and even travels with it when she can. Hers weighs 16 pounds. It doesn’t feel like 16 pounds when the weight is distributed over your entire body, though. (I’ve traveled with her and have carried her blanket in a tote bag through the hotel. Trust me—it’s 16 pounds.)

    A few months ago, a different friend asked me if I’d ever made one of these blankets. I hadn’t, but it didn’t seem too hard. She wanted this for her daughter who was a freshman in college and dealing with a lot of anxiety at the end of the school year. I was more than glad to help.

    After some discussion, we decided that while a soft minky fabric might be comforting, it might be too warm. We settled on some Robert Kaufman Kona Cotton quilting fabric in two colors—Oasis (a gorgeous teal) and Graphite (a medium gray). I bought two yards of each on Amazon (about $6/yard).

    How much weight? A rule of thumb for how much weight to add is to multiply the individual’s weight by 10% and add 1-2 pounds. My friend’s daughter weighs around 125-130, so we went with 14 pounds. I have a small kitchen scale that weighs to the tenth of a gram, so I converted 14 pounds to 6350 grams. Poly-Fil Poly-Pellets come in various packages, but the best deal I found was on 6-pound bags at Joann.com with a coupon. I bought 18 pounds and added a ball of cotton yarn to bump me up to free shipping. (Be sure to buy the hard plastic pellets like the ones inside Beanie Babies, not the Styrofoam beads for bean bag chairs.)

    I didn’t bother trimming off the selvedges, but I did even up the cut ends. With right sides together, I sewed the two lengths of fabric on three sides, using a ½″ seam allowance. I then turned it right-side out and pressed it.

    How many squares? To make things easier on myself, I made the squares the same width as my quilting ruler—3.5”. I divided the width and length (each) by 3.5 to determine the number of pouches. This gave me 12 columns by 20 rows—a total of 240 squares. Doing the math—6350 grams divided by 240 pouches—that’s about 26.5 grams of pellets per square.

    I couldn’t find my marking pen, so I used a sliver of soap to draw my lines. Some of the lines got smudged away as I handled the project, so I did have to re-draw them occasionally. The soap worked in a pinch, though.

    Next, I sewed the long columns. This made twelve 6-foot-long tubes, essentially. I weighed out 26.5 grams per tube and shook them to the bottom. (See Tip #2 below.) This was trickier than I expected because the pellets are imperfect with little burrs that catch on the fabric. Once all twelve columns were filled for a row, I placed a row of pins to keep the pellets from sneaking into my seam line and sewed across the width. Twelve more pouches…sew across. After a few rows, I didn’t worry so much about getting every single pellet in its proper square.

    Note how I pinned the fabric to keep the pellets from creeping into my seam line.

    I continued weighing, filling, pinning, and sewing until I got to the final row. I pinned the last row as usual. I tucked the raw edges under and pinned again. I sewed straight across the end.

    Tip #1: Set up your sewing machine on a long table so you can spread the blanket out while you sew. I normally use my sewing machine on an old computer desk. After sewing a few rows, the blanket started to get heavy and unwieldy. When I moved everything to a longer table, the sewing sped up considerably.

    Tip #2: Fill the upper portion of the columns near the openings and wait to shake the pellets down all the columns together. You’ll be able to tell which column you’re on, and you won’t accidentally miss one or fill one twice.

    Bonus Tip: Sewing this blanket can be a surprisingly great workout! My weighing station was on my ironing board, but I was filling and pinning the blanket on the floor. That means I did roughly 250 squats over the course of 24 hours! Add to that, schlepping a heavier and heavier blanket back and forth. I don’t necessarily recommend this workout, but it gave me a great story.

    This project costs quite a bit more than my typical Handmade Christmas ideas, about $66 total per blanket. (Shop around and/or wait for good coupons.) If you plan to make several, you might get a better bulk discount on the pellets. This is obviously a special gift you’d make for someone who could really benefit from it, not one to give to all your neighbors and cousins and fringe friends. But this could be the best gift ever for a very lucky person in your life.


    Weighted Blanket

    Finished Measurements: Approximately 43” x 71”

    Materials

    Cotton quilting fabric in 2 colors—44-45” wide, 2 yards of each

    Poly-Fil Poly-Pellets—about 10% of body weight plus 1-2 pounds

    Kitchen scale

    Marking pen, quilting ruler, scissors, pins

    Sewing thread—2 spools

    Paper cups for weighing and pouring pellets into blanket

    Instructions

    Press fabric. If necessary, trim fabric to square up the ends. Place right sides together.

    Using 1/2” seam allowance, sew together along one short and two long edges.

    Turn right-side out and press.

    Mark lengthwise lines for columns. Sew along these lines.

    Mark perpendicular lines for rows, but do not sew yet.

    Weigh Poly-Pellets for each square. (See above for calculations.) Pour pellets into each column. Once all columns have been filled, lift blanket and shake pellets to bottom. Pin and sew across row. The squares will not be firmly filled, so don’t worry if they look droopy.

    Continue filling one row at a time until all squares have been filled. Pin last row to keep pellets from escaping. Turn both edges to the inside and sew across top of blanket, close to the edge.

    Trim any remaining threads and wash blanket to remove pen marks.